The 2 PM slump isn’t a failure of willpower; it’s a failure of biomechanical engineering in your workspace.
- Treat your body as a lever system: every inch of misalignment multiplies forces on your spine, leading to fatigue and pain.
- Configure your equipment for active support, engaging your core and decompressing your spine even while sitting.
Recommendation: Systematically adjust your equipment based on geometric principles, not just comfort, to eliminate the root causes of physical fatigue.
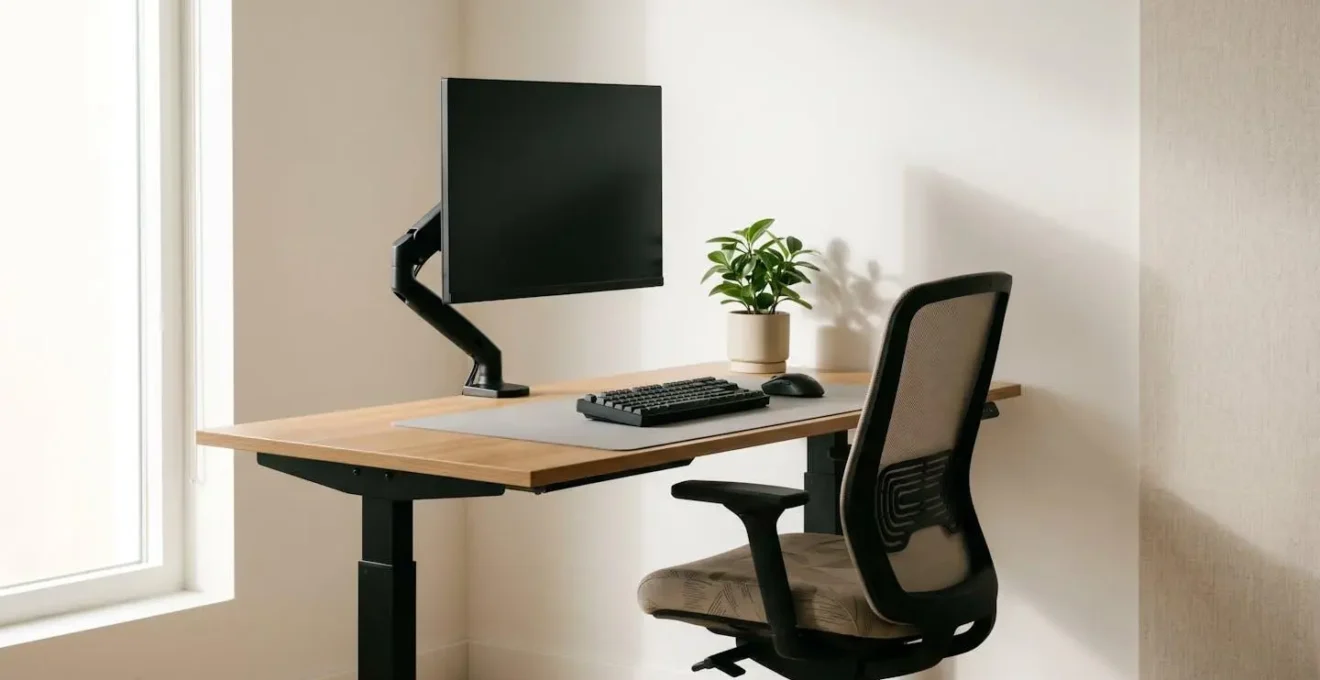
That familiar wave of fatigue, the dull ache in your lower back, and the tension headache that arrives like clockwork around 2 PM—for many remote workers, this is the unavoidable reality of a day spent at the desk. The common advice is predictable: buy a better chair, take more breaks, maybe even switch to a standing desk. While well-intentioned, these suggestions often treat the symptoms without addressing the root cause, which is fundamentally a problem of physics.
Your workspace is a dynamic biomechanical system. Every piece of equipment, from your monitor to your chair, acts as a force-multiplier on your body. An incorrect angle or a few inches of misalignment can translate into dozens of pounds of unnecessary load on your spine and a constant, low-grade strain on your muscles and nervous system. This isn’t about comfort; it’s about engineering. It’s about understanding the geometry of posture and the levers that govern physical strain.
But what if, instead of fighting against your body, your workspace could be calibrated to support it automatically? This guide abandons the platitudes. We will not simply tell you to « sit up straight. » Instead, we will deconstruct your desk setup piece by piece, applying core principles of biomechanics, physics, and ergonomics. The goal is to transform your workspace from a system that drains your energy into a precision-tuned engine that sustains it, ensuring the 2 PM slump becomes a thing of the past.
This article will guide you through a complete ergonomic reconfiguration, focusing on the geometric relationships between you and your equipment. We will analyze each component, from monitor height to lamp placement, to build a workspace that prevents pain and preserves focus throughout the day.
Summary: The Blueprint for an Ergonomic Workspace
- Why Your Monitor Height Is Causing Your Afternoon Headaches?
- How to Adjust Your Office Chair to Engage Your Core Automatically?
- Standing Desk vs. Active Sitting Stool: Which Is Better for Lower Back Pain?
- The Keyboard Angle That Leads to Carpal Tunnel Syndrome
- Where to Place Your Lamp to Eliminate Glare and Eye Fatigue?
- Why Every Inch of Forward Head Posture Adds 10lbs of Load to Your Spine?
- How to Perform the Farmer’s Carry to Fix Your Posture Instantly?
- How to Reverse Chronic Inflammation in the Cervical Spine Caused by Tech Neck?
Why Your Monitor Height Is Causing Your Afternoon Headaches?
The persistent, tension-style headache that begins at the base of your skull and radiates forward is often the first sign of ergonomic failure. The primary culprit is rarely the screen itself, but its position. An incorrectly positioned monitor forces your neck into a sustained, unnatural posture, leading to what is known as « tech neck » or Forward Head Posture (FHP). This misalignment creates continuous tension in the suboccipital muscles, which are directly linked to tension headaches.
The standard advice to « place the monitor at eye level » is a simplification. The correct height is a geometric calculation: the top edge of the screen should be at or slightly below your horizontal line of sight, and your gaze should be angled slightly downward at a 15-20 degree angle to the center of the screen. This position allows your neck to remain in a neutral, relaxed state. According to occupational health research, an improperly positioned monitor is a leading cause of musculoskeletal problems in the neck and shoulder area, directly contributing to daily fatigue.
Modern ergonomics is moving beyond static setups. A 2024 study on dynamic versus static monitor heights revealed a significant insight. It found that monitors which periodically and automatically adjust their height and tilt resulted in a measurably lower increase in neck pain over an extended workday. This is because micro-adjustments prevent the static loading and muscle fatigue that build up over hours, proving that movement—even in your equipment—is key to preventing strain.
How to Adjust Your Office Chair to Engage Your Core Automatically?
An ergonomic chair is not a passive hammock for your body; it’s an active tool designed to promote correct postural geometry. The goal of proper chair adjustment is to create a stable pelvic base that allows your spine to stack naturally, thereby engaging your core muscles without conscious effort. When your hips are properly supported, your abdominal muscles activate reflexively to maintain balance, reducing the load on the lumbar spine and preventing the slouch that leads to lower back pain.
Many users fail to unlock this benefit because they adjust for initial comfort rather than for biomechanical function. A correctly calibrated chair should feel supportive and slightly « active, » not plush and lazy. This involves a precise sequence of adjustments that puts your body into a state of balanced tension, where your skeleton supports your weight, and your muscles are free to stabilize rather than strain.
The details of this calibration are what separate a pain-inducing seat from a performance tool. The lumbar support, seat pan depth, and recline angle all work together to create a system of forces that guide your body into alignment. The image below highlights the key adjustment points that facilitate this automatic core engagement.
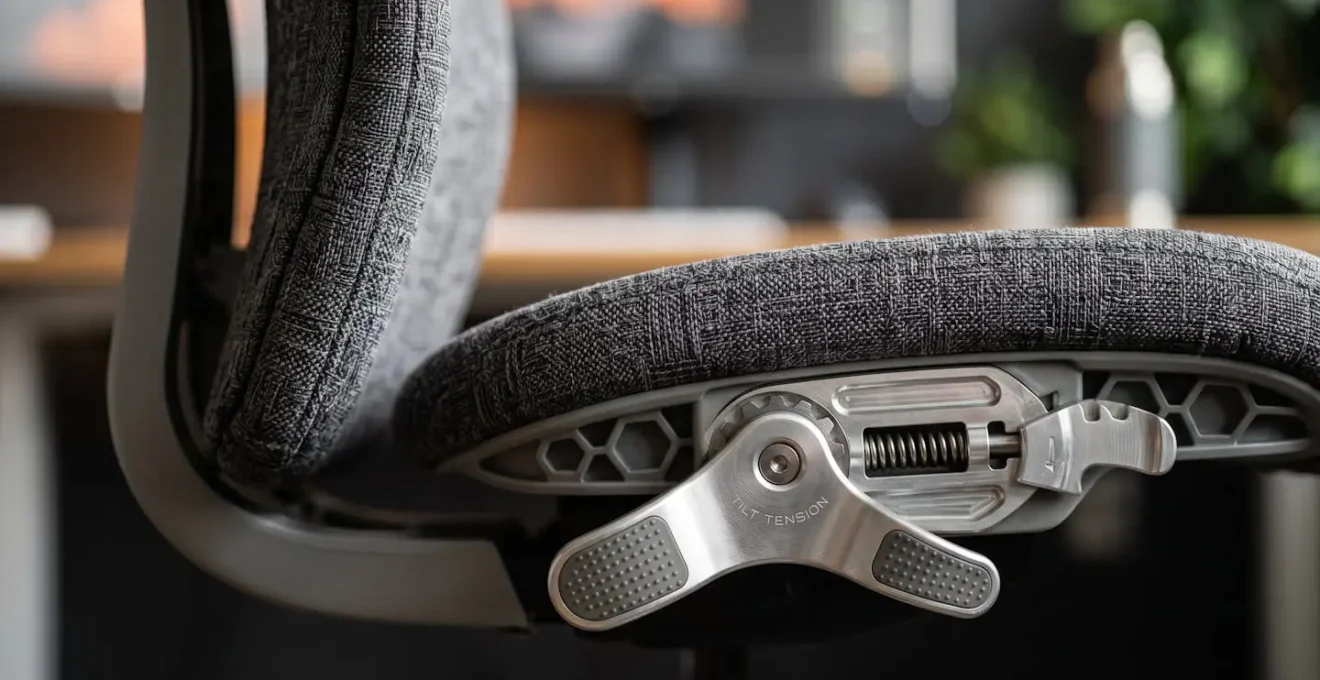
As the visual detail suggests, the engineering of a high-quality ergonomic chair is focused on these micro-adjustments. Achieving the correct setup is a matter of following a clear, step-by-step protocol. It is a process of calibration, not just of finding a comfortable spot. This systematic approach ensures that the chair works with your body’s natural mechanics.
Action Plan: Calibrate Your Chair for Automatic Core Engagement
- Establish Pelvic Stability: Push your hips as far back as they can go in the chair. This ensures your pelvis is supported by the backrest, forming a stable foundation for your spine.
- Set Geometric Height: Adjust the seat height so your feet are flat on the floor and your knees are at or slightly lower than your hips. This creates a 90 to 100-degree angle, promoting healthy circulation and preventing pressure on the underside of your thighs.
- Decompress the Spine: Adjust the backrest to a 100-110 degree reclined angle. This slight recline opens up the angle of your torso, decompressing the diaphragm and reducing pressure on your lumbar discs more effectively than a rigid 90-degree posture.
- Relax the Shoulders: Position the armrests so your shoulders remain relaxed and your elbows rest gently at your sides, forming a roughly 90-degree angle. The armrests should support the weight of your arms, preventing tension in your neck and shoulders.
Standing Desk vs. Active Sitting Stool: Which Is Better for Lower Back Pain?
The debate between standing and sitting has been oversimplified. Standing desks are often marketed as a panacea for the sedentary lifestyle, but the reality is more nuanced. The true enemy of spinal health is not sitting itself, but static posture. Holding any single position for too long, whether sitting or standing, leads to muscle fatigue, reduced blood flow, and increased load on specific spinal structures. The solution lies in introducing dynamic movement into your workday, and both standing desks and active sitting stools offer different paths to this goal.
Standing desks primarily work by changing the load-bearing equation. A 2018 study found that workers using sit-stand desks experienced a 50% decrease in low back pain compared to those who sat all day. This is because standing engages the large muscles of the legs and core to support the body, distributing the load more evenly and reducing the compressive forces on the lumbar spine that are characteristic of prolonged sitting.
However, standing is not without its own biomechanical risks. The transition to a standing desk must be gradual, as your muscles and joints need time to adapt. As a notable University of Waterloo study on the topic points out:
Nearly half of people who use a standing desk are at risk of developing lower back pain.
– University of Waterloo study, Research on standing desk tolerance and back pain
This occurs when people stand for too long without adequate conditioning, leading to fatigue in the postural muscles and a subsequent shift of the load onto the ligaments and joints of the lower back. An active sitting stool, by contrast, encourages « micro-movements » while seated. Its unstable base requires constant, subtle adjustments from your core and leg muscles to maintain balance. This keeps the muscles engaged, promotes blood flow, and prevents the static loading that causes stiffness and pain, making it an excellent tool for building core stability.
The ideal choice depends on your specific condition. For individuals with disc-related pain, alternating between sitting and standing can be highly beneficial for decompressing the spine. For those with weak core muscles or general stiffness, an active sitting stool can serve as a powerful rehabilitation tool. Ultimately, the best solution is often a combination: using a sit-stand desk that allows you to vary your position throughout the day, and incorporating an active stool for short periods to build postural endurance.
The Keyboard Angle That Leads to Carpal Tunnel Syndrome
Carpal Tunnel Syndrome is a condition of pressure. It occurs when the median nerve, which runs from the forearm into the hand, becomes compressed at the wrist. While many factors can contribute, the geometry of your keyboard setup plays a direct and critical role. The culprit is not typing itself, but typing with the wrists in a non-neutral, extended, or deviated position for prolonged periods. This faulty posture narrows the carpal tunnel, increasing pressure on the median nerve and leading to pain, numbness, and weakness.
The two most damaging positions are wrist extension and ulnar deviation. Wrist extension happens when your wrists are bent upwards, a common result of using a standard keyboard with its kickstands propped up. This angle tightens the tendons on the underside of the wrist, compressing the carpal tunnel. Ulnar deviation is when the wrists are bent outwards towards the little finger, a posture forced by the straight layout of a conventional keyboard that doesn’t match the natural angle of our arms.
To prevent this, the goal is to maintain a neutral wrist posture at all times. This means your hands should be in a straight line with your forearms, both vertically and horizontally. To achieve this:
- Eliminate the incline: The keyboard should be flat or even negatively tilted (angled away from you). The pop-out feet on most keyboards are an ergonomic anti-pattern; they should almost always be retracted.
- Position for elbow angle: Adjust your chair height so that when your fingers are on the home row, your elbows are at a 90-degree or slightly more open angle, with your forearms parallel to the floor. Your wrists should float just above the keyboard, not rest heavily on a wrist rest while typing.
- Consider a split keyboard: For many, achieving a neutral horizontal posture is impossible on a standard keyboard. An ergonomic split keyboard allows each half to be positioned independently, aligning directly with each forearm and eliminating ulnar deviation.
A wrist rest can be a useful tool, but only when used correctly. It is designed for resting the palms of your hands *during pauses* in typing, not for anchoring your wrists while you type. Resting on it while typing can increase pressure inside the carpal tunnel. The focus must always be on maintaining that straight, « floating » line from elbow to fingertip.
Where to Place Your Lamp to Eliminate Glare and Eye Fatigue?
Visual ergonomics is often the most overlooked aspect of a workspace setup, yet it has a profound impact on energy levels. Eye fatigue, or asthenopia, is a hidden energy drain caused by your eyes constantly working to overcome poor lighting conditions. The primary culprits are glare and high contrast. Glare is reflected light from your screen or work surface, while high contrast occurs when your screen is significantly brighter or dimmer than your surrounding environment. Both force your pupils to constantly micro-adjust, leading to headaches, dry eyes, and mental fog.
The solution lies in creating a balanced « lighting ecosystem » for your workspace, built on three distinct layers. This framework ensures that your eyes are subjected to minimal stress, preserving your cognitive energy for your actual work. The goal is to minimize the difference in brightness between all three layers, creating a visually harmonious environment.
The three-layer lighting framework consists of:
- Layer 1 (Ambient Light): This is the general, overall illumination of the room. Natural daylight is ideal, as it is known to reduce stress and improve mood. If relying on artificial light, it should be diffuse and evenly distributed. A critical rule is to position your desk so that windows are to your side (a 90-degree angle), never directly in front or behind you, to prevent direct glare on your screen or in your eyes.
- Layer 2 (Task Light): This is the focused light on your immediate work area, provided by a desk lamp. Its placement is crucial: position the lamp on the side opposite your writing hand to prevent your hand and arm from casting shadows over your work. The lamp should be adjustable, allowing you to direct the light precisely where it’s needed and change its intensity to match the time of day.
- Layer 3 (Screen Light): This is the light emitted by your monitor. Its brightness should be adjusted to match the ambient lighting of the room. A simple test is to hold a white piece of paper next to the screen; the screen’s white background should be of a similar brightness.
By synchronizing these three layers, you create a seamless visual field where your eyes can move from screen to paper to the room beyond without stressful readjustments. This is the foundation of preventing the hidden fatigue that drains your productivity long before the end of the day. Incorporating the 20-20-20 rule—looking at something 20 feet away for 20 seconds every 20 minutes—provides an active break for your eye muscles within this well-lit environment.
Why Every Inch of Forward Head Posture Adds 10lbs of Load to Your Spine?
The human head is a marvel of biomechanical engineering, weighing approximately 10-12 pounds. In a neutral alignment, this weight is perfectly balanced atop the cervical spine, requiring minimal muscular effort to support. However, the moment your head moves forward from this central axis, the physics of leverage takes over, and the effective weight on your spine multiplies dramatically. This is the fundamental principle behind the devastating effects of Forward Head Posture (FHP), commonly known as « tech neck. »
Think of your neck as a lever. When your head is aligned over your shoulders, the load is directly on the fulcrum (your spine). But for every inch your head juts forward, it increases the length of the lever arm. This forces the muscles in the back of your neck and upper back to act as a counterbalance, contracting intensely to prevent your head from dropping onto your chest. As a result, biomechanical research shows that the effective load on your cervical spine increases by roughly 10 pounds of weight per inch of forward translation.
This means a head that has drifted just 3 inches forward is forcing your neck muscles to support an effective weight of 42 pounds (12 lbs of head + 30 lbs of leverage). This sustained, excessive load has profound consequences, from chronic muscle strain and tension headaches to accelerated degeneration of the spinal discs and joints.
The biomechanical analysis of this phenomenon is stark, explaining why this posture is so damaging. As one source clearly states:
The cantilevered (poked forward) head position loads the spine up to several times more than erect posture, because of the increased moment arm.
– Wikipedia biomechanical analysis, Forward head posture effects on spine loading
This « cantilevered » position is the direct result of a poorly configured workspace: a monitor that is too low, a laptop used without a separate stand, or a chair that encourages slouching. Every element of your ergonomic setup is either promoting a neutral spine or contributing to this dangerous multiplication of forces. Understanding this principle of leverage is the key to appreciating why millimetric adjustments to your workspace can have a macroscopic impact on your health and energy.
How to Perform the Farmer’s Carry to Fix Your Posture Instantly?
While a perfectly engineered workspace prevents postural degradation, we also need active strategies to correct the patterns ingrained by years of slouching. The Farmer’s Carry is a foundational strength exercise that has a remarkable, immediate effect on posture. Its power lies in its ability to provide a « neurological reset » by activating the entire chain of postural muscles, from your grip to your upper back, forcing your body into optimal alignment.
The genius of the Farmer’s Carry is its simplicity and the feedback it provides. When you hold a heavy weight in each hand, your body instinctively finds the most efficient way to carry it, which is with a tall, stable spine. Your shoulders pull back and down, your chest opens up, your core engages to stabilize your torso, and your head aligns naturally over your spine. It’s a full-body lesson in good posture, taught by the laws of physics. You don’t need a gym to reap these benefits; you can integrate a « micro-dose » version into your workday using everyday office objects.
This isn’t about building brute strength, but about re-educating your nervous system. The intense grip activation stimulates the rotator cuff muscles, which are crucial for shoulder stability and pulling the shoulders back into a healthy position. It’s an active antidote to the passive slump of « screen-time posture. »
Here is a simple protocol to perform a micro-dose Farmer’s Carry in your office or home workspace:
- Select Your Weights: Find two objects of equal weight that you can grip securely. Full water bottles, stacks of books, or even two laptops can work perfectly.
- Grip and Stand: Grasp the objects firmly. Engage your core by bracing your abdominal muscles, and stand up, focusing on creating a perfectly upright, « proud » posture with your shoulders back and down.
- Perform the Carry: Walk for 30-60 seconds. This could be a walk to the kitchen for a glass of water or a few laps around your workspace between tasks. The key is to maintain that perfect, neutral spine throughout the walk.
- Focus on Grip: Squeeze the objects firmly. This powerful grip activation is what sends a signal up your arms to stabilize your shoulders and upper back, « waking up » dormant postural muscles.
- Repeat and Reinforce: Perform this micro-carry 3-5 times throughout your day. Each repetition serves as a powerful neurological reset, reinforcing the feeling of optimal spinal alignment and making it easier to maintain good posture when you return to your desk.
Key Takeaways
- Posture is Physics: Your body is a system of levers. Small misalignments in your workspace create large, damaging forces on your spine.
- Setup Dictates Activation: An engineered workspace doesn’t just provide comfort; it actively engages your core and supports a neutral spine, reducing muscular strain automatically.
- Dynamic is Superior to Static: The goal is not a single « perfect » posture, but to enable and encourage frequent micro-movements and position changes throughout the day.
How to Reverse Chronic Inflammation in the Cervical Spine Caused by Tech Neck?
Years of Forward Head Posture do more than just cause muscle strain; they create a state of chronic, low-grade inflammation in the soft tissues of the cervical spine. As clinical research demonstrates, FHP increases compressive loading on the ligaments, tendons, and facet joints of the neck. This sustained mechanical stress triggers an inflammatory response, leading to a vicious cycle of pain, stiffness, and further postural degradation. Reversing this requires a two-pronged approach: first, correcting the mechanical stress with proper ergonomics, and second, actively addressing the inflammation at a physiological level.
Addressing the inflammation is not just about taking a painkiller. It involves a multi-system approach that supports your body’s natural healing processes. This includes providing the right nutrients to quell inflammatory pathways, ensuring adequate hydration to flush out metabolic waste, and using targeted therapies to improve circulation and reduce nerve irritation. A holistic protocol can significantly accelerate recovery and build resilience against future strain.
The following strategies work synergistically to reduce inflammation in the cervical spine:
- Nutritional Intervention: Chronic mechanical stress can exacerbate inflammatory pathways like COX-2. Increasing your intake of nutrients with anti-inflammatory properties, such as Omega-3 fatty acids (found in fish oil), Curcumin (from turmeric), and Magnesium, can help modulate this response at a cellular level.
- Systemic Hydration: Your lymphatic system is responsible for clearing inflammatory byproducts from tissues, but it requires adequate fluid to function optimally. Maintaining consistent water intake throughout the day is a simple but critical step in supporting this natural detoxification process.
- Manual Drainage and Movement: Gentle neck rotations and chin tucks improve local circulation without adding stress. Additionally, self-massage of the supraclavicular lymph nodes (located just above the collarbone) can help stimulate lymphatic drainage from the head and neck, further reducing tissue congestion.
- Targeted Temperature Therapy: Temperature can be used strategically to manage inflammation. Applying a heat pack to the upper back and shoulders for 15 minutes at the end of the workday can increase blood flow and relax tight muscles. This can be followed by a 5-minute application of an ice pack to the base of the skull to reduce any residual nerve inflammation and provide analgesic relief.
This recovery protocol, combined with the ergonomic adjustments detailed throughout this guide, creates a comprehensive system for not only managing but reversing the chronic effects of tech neck. It shifts the focus from passively enduring pain to actively building a more resilient and functional body.
Begin a systematic audit of your workspace today. Apply these geometric and biomechanical principles methodically to transform your desk from a source of strain into a platform for peak performance and sustained energy.